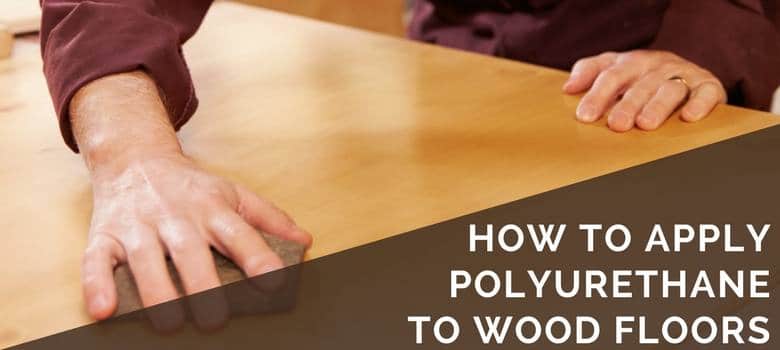
So you’ve finished installing those hardwood floors—awesome job! But wait, you aren’t done. Do you know how to apply polyurethane to wood flooring for that awe-inspiring finish? You wouldn’t want all your hard work to go to waste, would you?
Polyurethane acts as a shield for your wood floors. It protects the wood from the scratches and spills that come with everyday life. Urethane is available in two varieties and several sheen levels, ranging from glossy to matte.
The application process can be tricky, so you’ll need to brush up on your skills. Here’s what you should know before attempting a polyurethane finish.
- Should You Use Water-Based Or Oil-Based Polyurethane?
- What Materials Do You Need?
- Time To Prep
- The Application Process
- FAQs About Applying Polyurethane To Wood Flooring
- To Sum It up
Should You Use Water-Based Or Oil-Based Polyurethane?
To start with, you must decide whether to use an oil-based or water-based product. Both will protect your floors, whether you have traditional or engineered hardwood, but there are notable differences.
Water-based polyurethane goes on clear and will not alter the color of the wood. It’s also thinner than other solutions and dries quickly. You can walk on your floors within 8-12 hours of application.
Water-based finishes are less flammable and don’t contain harmful VOCs. They won’t emit strong odors or fumes. And when it comes time to clean up, all you’ll need is soap and water.
This type of polyurethane is the most expensive and least durable. Because these urethanes are comprised of fewer solids, you’ll need to apply several coats for maximum protection.
If you seal your wood with a water-based product, expect to repeat the process every two years.
By comparison, oil-based polyurethane enhances the coloring of the wood and gives it a soft glow. Due to their composition, oil-based products are thicker and take longer to dry. They do emit fumes, though, so prepare to don a face mask.
There is an upside to this type of urethane: Oil-based products fortify the wood with a solid layer of armor. They take fewer coats than water-based poly and cost half as much as water-based products.
What Materials Do You Need?
It’s time to whip out your pen and paper (the list is longer than you’d think). But, don’t worry—most of the products are inexpensive and can be found locally.
Once you’ve decided on which polyurethane you’ll use, it’s time to research brands. It’s important to choose a brand that’s upfront about the chemicals and storage requirements. Look for a company that offers telephone support, in case you need advice.
Unless you have one on hand, you’ll need to rent an orbital sander from your local hardware store. Be sure to buy sandpaper in varying levels. The pros recommend you purchase 36-, 60- and 120-grit to start.
And don’t forget to grab 220 grit sandpaper-and a pole sander for use between coats. If you don’t want to buy a pole sander, you can make one out of a broom handle and a sanding block.
You’ll also need urethane-rated brushes and a lambswool or synthetic applicator. You can use a T-bar for getting into corners and door jambs. T-bars work best with water-based formulas, so you may want to buy a roller instead.
This project requires a shop vac, so borrow one if you need to (or check out our review of the 6 best shop vacs). Remember to pick up a respirator and some gloves. Masking tape and mineral spirits will come in handy during prep, so make sure you buy them.
Time To Prep
Now that you’ve got the shopping out of the way, it’s time to prepare your workspace. This is the most crucial and tedious part of the process.
Begin by vacuuming your hardwood floors and set yourself up to start with a clean surface. Dig into the corners and clear away any dust or cobwebs. Open some windows and let the room air out a bit.

After you’re done with that, it’s time to start sanding off the old finish. If you’re not sure how to operate the sander, queue up some online tutorials. Start with the roughest sandpaper and work your way up.
Don’t sand in one area too long or you’ll risk scoring the wood. Check the surface one last time for splinters or dents.
When you’re done sanding, vacuum away the dust and wipe the boards with a lint-free cloth and mineral spirits.
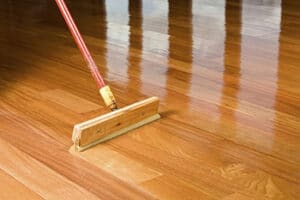
The Application Process
Now you’re ready for the main event. Start by stirring the polyurethane with a paint stick. Never shake a can of polyurethane or you’ll sabotage the finish with air bubbles.
Load your brush or applicator with poly and tap off any excess. Pick a corner and start working about a foot out, going in the direction of the grain. Use long, overlapping strokes to ensure an even coat.
Look for signs of dripping and correct these spots before they dry. Wait a few minutes after the first coat, and check one more time for blemishes or places you may have missed. Apply the polyurethane to the corners and blend it into the boards.
Let the first coat dry completely before restarting the process. Be sure to read the manufacturer’s guidelines on drying times. Once the floor is dry, you can wet sand any drip marks or imperfections.
Repeat the application as needed, allowing the floors to dry between coats. Most wood floors require 2-3 coats, but it’s best to check with your flooring manufacturer before calling it quits.
FAQs About Applying Polyurethane To Wood Flooring
The best applicator for applying oil-based polyurethane to wood floors is a lambs wool applicator. This accessory is effective in spreading the polyurethane evenly across the surface, much more so than using a paint roller, although a roller can work with water-based products.
Before using a lambs wool applicator, remove hair, lint, and other debris from the wool’s surface. An easy way to do this is to cover the surface with painter’s tape or anything similar and then ripping it off. All the loose debris will stick to the tape, so it doesn’t end up on your floor during application.
For corners, skirtings, and other nooks and crannies, use a natural bristle brush. It’s up to you whether you find a 3” or a 5” brush most comfortable to work with. Just use a finishing brush and not a regular paint brush.
How Do You Apply Water-Based Polyurethane To Hardwood Floors?
When you work with water-based polyurethane, use a synthetic bristle brush in the corners of the room, rather than one with natural bristles.
For the center of the room, you can use a roller or trim pads. Make sure it’s a synthetic pad, though, since this won’t retain the polyurethane, making it easier to apply.
In terms of how to apply polyurethane to wood flooring, start in the corners with your brush and then apply it to the center with your roller. Just remember to plan in such a way that you have a place to exit the room without stepping on the wet floor.
Wait for the floors to dry. Drying times vary based on circulation and temperature. Usually you can apply a new coat of water-based polyurethane for wood floors after three hours.
When using a water-based product, apply the polyurethane as many as four times for best results.
How Many Coats Of Polyurethane Should You Put On A Wood Floor?
The number of coats you apply depends on the type of product you’re using. For oil-based products, it’s usually enough to have two coats or a maximum of three. For water-based polyurethane-finished wood floors, plan to apply up to four layers.
It’s best to apply more coats than settle for less. Remember, each layer adds another barrier of protection. You can settle for fewer coats, but in doing so you may end up refinishing the floor sooner than you think. Instead, put in the time now and apply the polyurethane one more time, so you enjoy more longevity.
Can I Use A Rag To Apply Polyurethane?
Yes, you can use a rag as an option for applying polyurethane to floors. It’s especially a helpful method if you’re working on a vertical surface or have a contoured area you need to varnish.
Just note that you must be meticulous in your process, or you won’t have an even finish. Don’t place too much polyurethane on the rag to start with. Too much product can result in a raised grain. Also, work with the grain when applying.
For best results, you can also look for wipe-on polyurethane products designed to be applied with a cloth. Note that these products are often much thinner than some other polyurethane products. So, when you’re planning how to put polyurethane on wood floors with a rag, schedule enough time to apply as many as four coats.
Can I Use A Foam Brush To Apply Polyurethane?
Yes, you can certainly use a foam brush to apply polyurethane to hardwood floors. You’ll appreciate that this type of brush rarely drips product on the wood flooring you’re working on. Only when you apply pressure will the polyurethane leave the foam.
It’s also easy to have neat results. If there are any bubbles in the polyurethane layer, you can eliminate them by simply making another stroke over the same area.
When planning how to apply polyurethane to wood flooring, some people prefer foam brushes to bristle brushes because you can simply throw away these cheap applicators once you’re done. That minimizes the cleanup time.
What Is The Best Polyurethane For Wood Floors?
Different polyurethane products are best for different scenarios.
When wondering how you polyurethane hardwood floors in high-traffic areas such as an entrance hall or an office space, you’ll need oil-based polyurethane. This type is easier to maintain than water-based products and it’s more durable too. Oil-based products are also more water-resistant, so soap and water spills won’t easily damage the floor.
A water-based polyurethane layer on your wood flooring will be your ideal option if you’re looking for a faster solution. These products dry much faster than oil-based polyurethane, so you don’t need as much time to complete your project.
You’ll also find that water-based products have less odor and won’t release many volatile organic compounds. These VOCs can be harmful to the environment, making a water-based coat on your wood floors a more eco-friendly option.
Is It Necessary To Sand Between Coats Of Polyurethane?
Yes, it’s best to sand your hardwood floors between the successive coats of polyurethane you apply. Since each coat takes a while to dry, there’s a lot of time for dust to settle during the drying times. You’ll need to remove this layer so that hair and other particles don’t permanently form part of your flooring.
The other reason why sanding is so important is because it creates a rough surface that makes bonding easier for the next layer. Sanding also affects how smooth your floor will be. After the first layer, you’ll need to do considerable sanding to guarantee smoothness. For the other layers, sanding will be less intensive.
Give enough time for the floors to dry, so you’re sure it’s ready to sand. You’ll use different sanding methods for different polyurethane products. An oil-based layer requires steel wool, while you can use an abrasive pad for water-based polyurethane.
How Do You Apply Polyurethane Without Creating Bubbles?
When learning how to apply polyurethane to wood flooring, what you use as well as your technique will determine whether there will be bubbles in your polyurethane layers. When learning how to put polyurethane on wood floors, you need to start with the right applicator, such as a finish brush and not an ordinary paint brush. A finish brush will apply a thinner coat than a paint brush, which would deliver globs of product. The thinner the layer, the less chance you will have of creating bubbles.
Before you brush on the polyurethane, soak the brush in mineral spirits. You can also use water. This will displace the air caught between the bristles, so it doesn’t create bubbles once you start applying the polish. Gently brush it across a piece of newspaper to dry it out before use.
Thinning the polyurethane can also help. Use mineral spirits for oil-based polyurethane and water for water-based products. Use a ratio of three parts polyurethane to one part of your thinning material. Gently stir in the solvent; never shake the products to mix, because shaking will create bubbles even before you start.
When you start applying the polyurethane, practice applying thin layers in gentle strokes.
What Is The Best Temperature To Apply Polyurethane?
The perfect environment for using polyurethane is 70°F. This will ensure drying times don’t become too long.
If the temperature is as low as 55°F, it can cause water-based polyurethane to form a texture that resembles orange peel. With oil-based products, lower temperatures aren’t too problematic but will slow down oxidation processes. But you can still work in temperatures as low as 60°F.
If you work in much higher temperatures, the layers will simply dry quicker, especially with water-based polyurethane.
To Sum It Up
Finishing your wood floors with polyurethane isn’t rocket science, but it IS hard work. Applying the product requires a combination of ability and knowledge.
As with any home improvement project, careful selection and proper preparation will affect your results. Take the time to practice your technique on scrap wood. The most important thing to remember is to let your floors dry before sanding or walking on them.
While it may feel like a never-ending process, take heart in the fact that your wood floors are timeless. With regular maintenance, they’ll look beautiful for years to come.
Have you tackled a polyurethane application? Tell us about it in the comments below.
Back to Top
45 years ago We sanded a 50 years old red oak floor and prepared it for finishing. I talked to our local roller rink and he recommended a polyurethane they use (I don’t know what) we were covering 4 large rooms and a hall plus walk in closets. I didn’t have the time or ability to sand between coats so was sold an oil based substance that we painted between each of 5 coats of polyurethane, which was glossy. It is now 45 years later and the floor is still glossy and looks new except by the kitchen door that looks a little worn. Selling my house and people ask if the floors have just been redone. I don’t know what was the liquid put between each coat but never had any problem. The house was totally empty at the time so very little dust. I wish I knew as my new house has bamboo floors that could use some help. Any idea?
I just want to warn everyone, if you’re going to need more than a gallon of poly, mix the two gallons together in a clean plastic bucket! Stir well but don’t shake. I just finished 3/4 of the floor with minwax semigloss, when we did the rest the next day with the new gallon the shine is different. Apparently minwax mislabeled their cans!!!!! Don’t assume it’s what it says it is!!!!!!!!!
Can I use a floor buffer with coarse or medium pads between coats?
Nothing to rough. On any sanding machine do not recommend any sanding paper at all. Use the maroon colored 16″ round buffing pads. If you are doing a single room sized project then manual sanding works very well with either a 220 grit or a 320 grit sandpaper w&en used as follows. Do not use a hard backed sanding block, the best “tool” I have discovered for single room at a time flooring projects is the “Mr. Clean” sponge mop heads, the ones that get wrung out with the two plastic roller bars. Just use the mop head without the handle. The sandpaper wraps around it perfectly in either direction, just recommend a brand of sandpaper with the non-slip backing. I prefer the 320 grit, just enough to “scuff” most of the shine off the previous coat of poly. Do not think all the shine has to come off, attempting to remove all shine will almost certainly result in cutting to deep potentially removing spots of stain if used.
Yes, we use 150, 180 or 220 on the buffer when recoating floors
What is the best product to deal painted wood floors? I have just recently painted the living room floor and am not sure the proper product to use.
Hi, I installed refinished oak flooring from LL. The sheen isn’t what I was hoping for so I would like to top coat it with satin polyurethane. The floors are distressed so sanding with a orbital sander isn’t a option. I would like to clean the floors well and simply apply the satin coat to the factory coat. What do you think? Hanks, Tom
Hi Tom, prefonished floors usually have an aluminum oxide finish. Light abrasion and a recoat is not possible, as the new polyurethane will not bond to the aluminum oxide. Call a professional to ask them to chemically etch the floors with a product called Loba Contact. Then have them recoat the floors with the sheen that you desire
Hello, we have 100 year old pine floors with lots of character. We would like put a Clear Matte finish oil base poly on them. Is there a brand you would recommend? Also should we use Oil base conditioner before, If so wondering what brand for that too? Thanks
we just had our new hardwood floors stained and sealed. The color is beautiful but the floors are streaked and you can see every time the lambswool applicator was lifted. The man that did them is a professional with a large business. Not sure what the problem is? It almost looks like when you mop a floor with dirty water and it leaves streaks on the floor. Did they not clean it well enough after sanding and before sealing? We now have 4 coats of poly on the floors and they still look terrible! We don’t know what to do, we are wanting to move in and you’re right the smell is horrible!
We have a very large floor plan will oil base leave a line if we stop between rooms ?
How do I correct the white chalking of the polyurethane water based liquid on the 3rd application?
Sand it all off and go back with oil base…….Much better choice, lasts longer, looks better, easier to put on, cheaper, easier to repair if scratched. Only down side is the fumes……only lasts a few days. I have done dozens of floors and the only one I regret is the ONE I did with water base.
Oil based polys are indeed superior for durability.
However, oil based polls WILL tint a yellowish/orangish hue when cured…
If using a light colored stain such as varying shades of white then definitely recommend water based poly in this situation, it dries much clearer without concern of the tinting an oil based poly will cause.
Always recommend testing your selection of candidates of stain and poly on scrap flooring beforehand. Don’t worry about all the sanding steps on the testing. The Big Box stores have sample blocks about 3″x4″ in size for the flooring they sell, the bottom side of these are perfect for this testing!! 😉