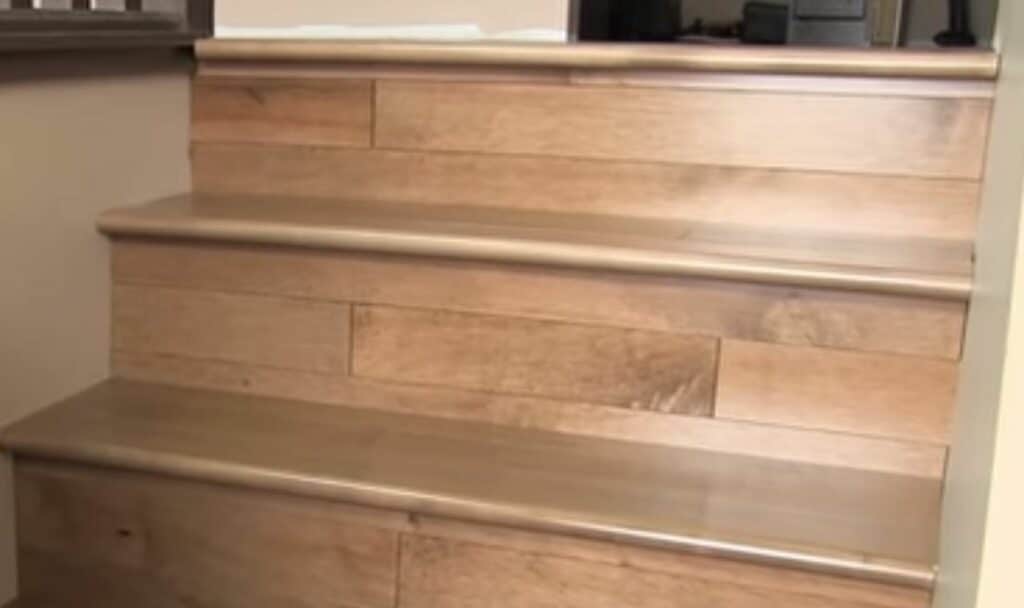
Wondering how to install vinyl plank flooring on stairs? Is it time to give your staircase a whole new makeover? Vinyl plank stairs are among the top options to consider for durable flooring.
Today’s article focuses on how to install vinyl plank flooring on stairs. We’ll also highlight the pros and cons of opting for vinyl, and then we’ll give you a breakdown on the latest styles! Keep reading for everything you’ve ever wanted to know about vinyl plank flooring for your stairs!
How to Install Vinyl Plank Flooring on Stairs
If you’re an avid DIY enthusiast, you might be wondering just how to put vinyl plank flooring on stairs. The good news is, it’s not that difficult to install vinyl plank flooring on stairs. In fact, we’ve narrowed the whole process down to 5 easy steps. If you’re keen to get your stairs upgraded, keep reading.
Tools Needed
- Jigsaw
- Fine-tooth blade
- Drill or nail gun with nails
- Carpenter square
- Tape measure
- Caulk gun
Materials
- Vinyl plank flooring
- Stair nosing (if not included in your packaging, you’ll have to buy separately)
- Construction (high-grade) adhesive
- Screws or nails
Preparation
Before you can begin the installation process, you’ll need to prepare the stairs. Proper preparation is key to ensuring the vinyl planks remain on the stairs once you’ve installed them.
Preparation Steps Include the Following:
- Let your vinyl planks acclimate to the room for at least 48 hours before you start the installation.
- Remove any old carpeting or flooring from the stairs; this includes molding, nosing, and trim.
- Ensure you have adequate space for the stair nose. If there are any stair overhangs, remove them using a jigsaw and trim back the baseboard if necessary.
- Make sure the stairs and any landings you’ll be flooring are completely level. Make sure any bumps, cracks, screws or nails are leveled out by using some caulking.
- Once this is done, sweep up any dirt, dust and loose debris.
- You might want to mop the area to ensure all the dust is removed. If you do this, ensure the floor is completely dry before moving on to installation.
Installation In 5 Easy Steps
It’s finally time to learn how to install vinyl plank flooring on stairs!
Step 1
Install the vinyl stair riser: This is the vertical surface of each stair. Measure the stairs before you cut any vinyl planks. Always double-check your measurements. Cut your vinyl to the exact specifications. Spread adhesive on the back of the plank and press it down firmly against the riser. Many homeowners add nails or screws into the corners of the risers to keep the planks securely fastened.
Step 2
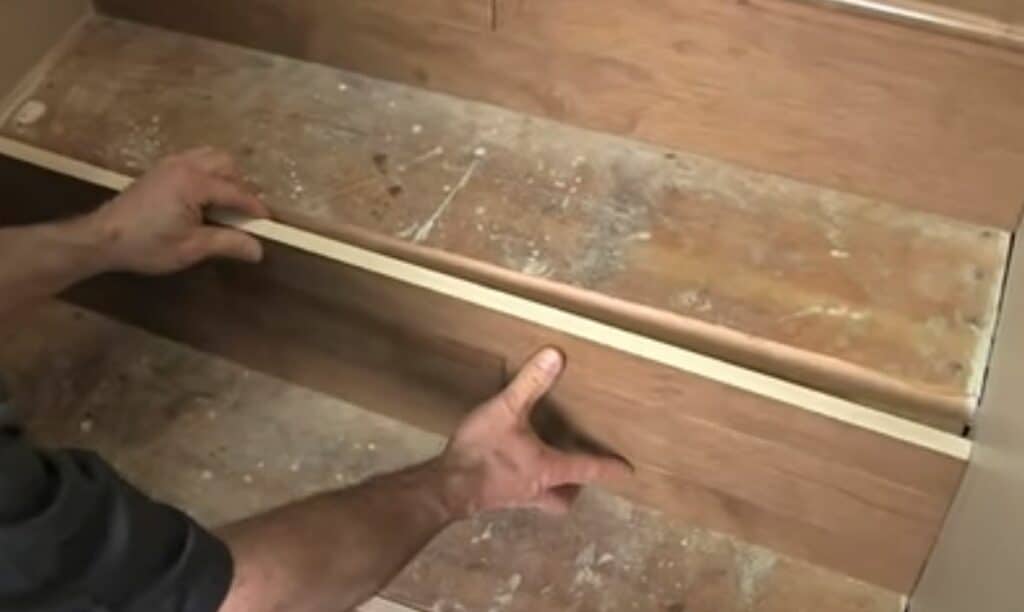
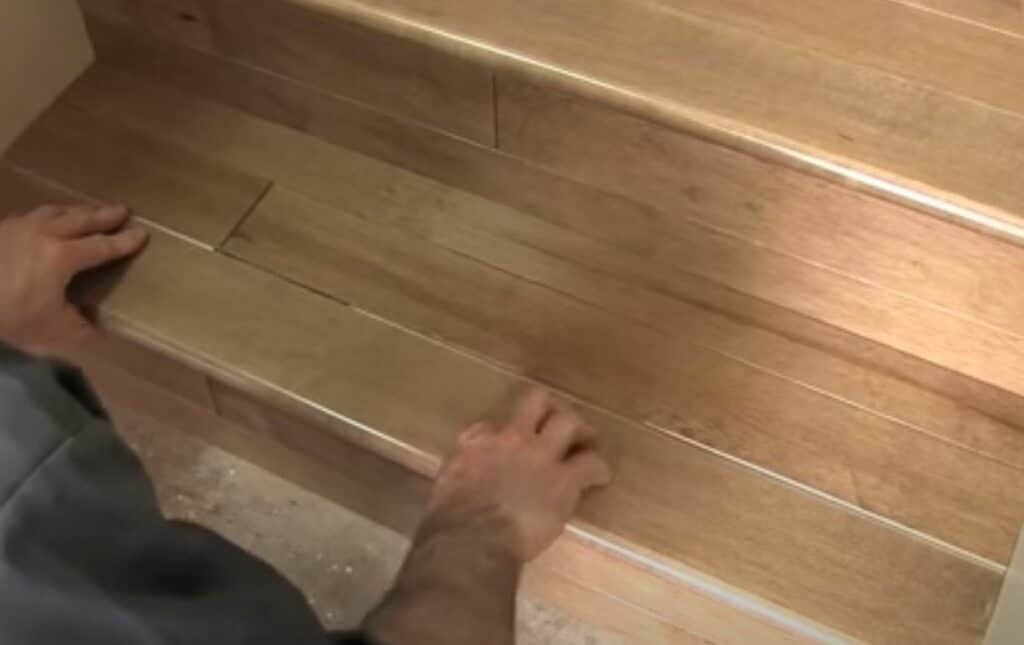
Measure and cut the vinyl stair tread: The tread is the part where your foot lands when you’re walking up the stairs. If your vinyl planks don’t include pre-cut nosing, you’ll have to ensure your measurements are correct. Vinyl planks should always lay flush against the matching nosing. Trim the nosing and vinyl plank to the exact length and if you need more than one length to make up the width of your stair, make sure they’re the same width. This will prevent gaps from forming later on.
Step 3
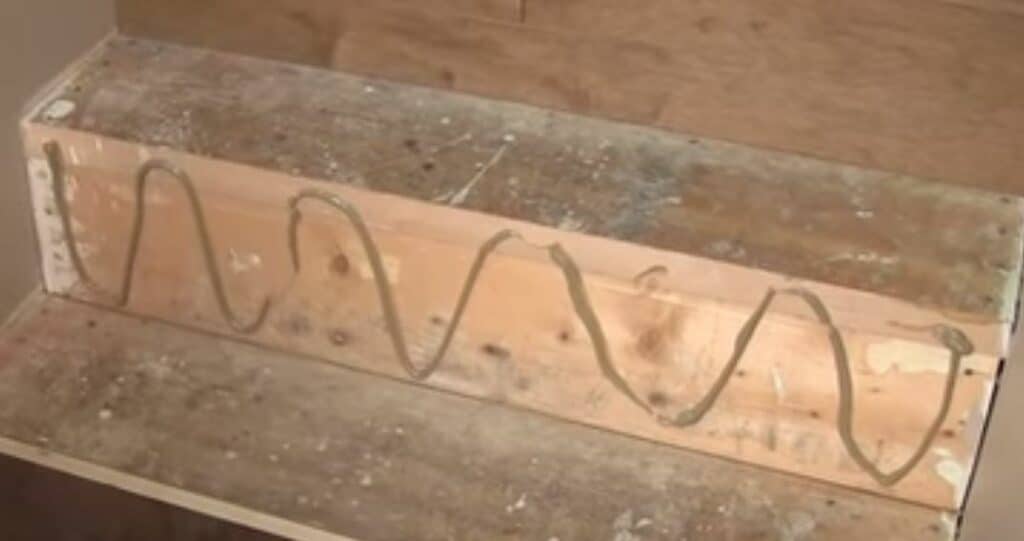
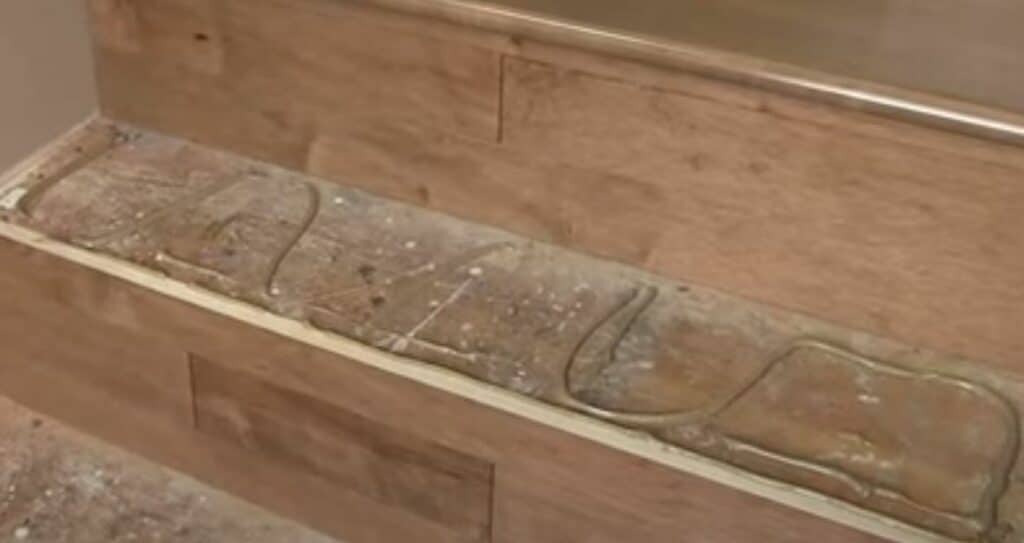
Install the vinyl stair tread and nosing: Before placing the adhesive on the plank and sticking it down, lay your planks on the stair and ensure that your measurements are correct. Apply adhesive to the plank in an S or V shape so that the glue doesn’t spill over the sides. Again, if you want to secure the planks with nails or screws in the corners, you can do that at this point. Add glue to the back of the vinyl stair nosing and gently rest it in place along the edge of the stair.

Step 4
Continue this with all other stairs: Ensure that you measure the planks and vinyl stair nosings before cutting or applying adhesive.
Step 5
Allow adhesive to dry: Adhesive should be dried completely before allowing anyone on the stairs. Double-check that each step is 100% complete before carrying on with the next one. You don’t want to end up being short on planks because you cut a few too short!
Pros and Cons of Installing Vinyl Plank Flooring on Stairs
No matter what type of flooring you’re going to install on your stairs, it’s always advisable to consider the pros and cons of each flooring type. Vinyl plank flooring for your stairs is no different. Let’s have a look at a few of the more common pros and cons of installing vinyl plank flooring on stairs.
Pros
- Affordable: Generally, vinyl planks cost between $1 – $10 per square foot. This makes them considerably cheaper than ceramic floors which could cost as much as $35. Engineered hardwood, on the other hand, could set you back anywhere from $10 to $30. As vinyl can also be installed by DIY, it’s easy to save on the costs of professional installation.
- Quick and easy to install: Vinyl flooring has a prominent reputation for being DIY- and user-friendly. Whether you opt for planks with the peel and stick installation or LVP’s with a click-and-lock system, it’s relatively easy to install. It isn’t even necessary to install vinyl on both the stair tread (where you step) and the stair riser. Depending on your style choice, you could simply install vinyl on the treads.
- Comfortable to walk on: Vinyl flooring is much softer to walk on than most other types of flooring. It also doesn’t get too hot during the summer or too cold during the winter. If you install the necessary underlayments, you can easily add more cushion under your feet. The addition of vinyl underlayments also dampens the sound when walking on the stairs.
- Durable: Vinyl flooring options are available in stain-resistant and waterproof options. It also has a long lifespan, with some vinyl floors lasting up to 10 to 20 years with a general warranty of up to 15 years. Vinyl is easy to clean by regular sweeping and mopping with mild cleaning solutions.
- Variety of designs: Vinyl has a wide variety of attractive designs to choose from. Dark and warm colors can be used if you want to make your stairs have a cozier feel. Opting for natural and lighter tones will make a room look more open. Whatever your current flooring design and decor, you’re guaranteed to find a vinyl option to complement it!
Cons
- Can be hazardous: Since vinyl flooring is made of polyvinyl chloride, stabilizers, plasticizers, pigments and fillers, it can be toxic. Some types of vinyl emit poisonous gases that can often be toxic to both humans and pets, resulting in a higher risk of asthma.
- Not environmentally friendly: Many types of vinyl are made of non-biodegradable materials that end up in the garbage dump once removed. When vinyl is burned, it produces dangerous fumes such as phthalates and dioxin which are harmful to the environment.
Everything You Need to Know About Installing Vinyl Flooring on Stairs
- Can Vinyl Flooring be Installed on Stairs?
- Is Vinyl Plank Better Than Peel and Stick Vinyl on Stairs?
- Pricing of Vinyl Flooring
- How Do You Clean Vinyl Flooring on Stairs?
- Popular Vinyl Flooring Options for Stairs
Before you commit to installing vinyl flooring on your stairs, you might be wondering about points such as durability, ease of installation and maintenance. Let’s dive right in and tell you why vinyl flooring is a great idea.
Can Vinyl Flooring be Installed on Stairs?
Yes! Vinyl planks can easily be installed on your stairs. Vinyl plank flooring on stairs is a common choice among homeowners for a number of reasons. Not only is vinyl strong, but it also creates a beautiful aesthetic that, if done correctly, will complement the rest of your floors.
Vinyl flooring is also a great idea for homes that have children and pets. Vinyl flooring is waterproof, easy to clean and perfect for high-traffic areas. Since this type of flooring is comfortable, firm, and doesn’t cause a lot of noise, it’s one of the more common floors for stairs.
Is Vinyl Plank Better Than Peel And Stick Vinyl on Stairs?
There are several types of vinyl flooring you can choose from. While you can certainly use both options, it’s important to note that peel and stick vinyl planks aren’t usually meant for high-traffic areas such as stairs. They also tend to start lifting off the floor if your subfloor isn’t perfect.
With peel and stick vinyl flooring, you can’t really add the underlayment needed to provide insulation and comfort. For durability on your stairs, you’d do well to opt for vinyl planks.
Pricing Of Vinyl Flooring
Another reason vinyl plank flooring is such a popular choice has to do with the price. It’s a wonderfully affordable alternative to expensive hardwood floors. Obviously, the type of vinyl combined with size and quantity will heavily influence the price.
Opting to go the DIY route means you only have to pay for standard materials, and not labor and installation costs. The lower quality vinyl planks cost on average $2 to $4 per square foot but you get what you pay for. If you’re going to opt for above-average quality materials, you could easily be looking at $3 to $7 per square foot. Depending on the number of stairs you have, this will definitely be much cheaper than engineered hardwood flooring!
If you’re having it professionally done, you might have to add the removal of the old stair flooring into the quote, unless you can do that part yourself. On average, installation costs vary from $1.50 to $10 per square foot. Be sure to tell your proposed installer that you’ll need the old flooring removed so that you can get an accurate quote!
How Do You Clean Vinyl Flooring on Stairs
If you already have vinyl floors anywhere in your home, then you know how easy they are to keep clean! If however, you’re new to the vinyl floor cleaning routine, simply follow these easy steps:
- Dust or sweep the stairs to remove dirt, debris, and dust.
- Use a clean damp mop to apply your cleaning solution to the stairs.
- Unless the solution’s instructions state otherwise, leave for 15 minutes and then wipe the soapy solution off with a damp wet cloth.
- Ensure you rinse all the soap off to avoid build-up that might cause slipping.
- An alternative to soap and water is apple cider vinegar. The acidity in vinegar easily removes grime and dirt without creating a soapy buildup. All you have to do is mix 1 cup of cider vinegar with a gallon of hot water. Use a damp mop to wipe off the water and vinegar mixture.
Popular Vinyl Flooring Styles for Stairs
Shopping for vinyl isn’t as simple as you might think. Once you’ve decided that you’d like to go the vinyl route, the next step is to decide which vinyl you’d like to opt for. There are many different options on the market. We’ve listed 3 of the more common vinyl plank flooring options for stairs.
Lucida USA Luxury Vinyl Planks

Lucida USA Luxury Vinyl Planks are the perfect solution for permanent flooring for your stairs. Aside from looking stylish, they’re also very easy to install. Since they come with protective backing paper, all you need to do is peel the paper off. Once you’ve cleaned and prepared your stairs, simply press the planks in place.
With Lucida USA, you can easily select your favorite from a wide range of different wood grain finishes in both light and dark finishes. You’ll be interested to know that they offer a solid black or white option as well. At 2mm, they’re much thicker than many other vinyl options for stairs. An integrated IXPE underlayment reduces noise.
Flooret Modin Vinyl Planks

Flooret’s Modin Vinyl Planks should definitely make it to your shortlist if you’re looking for flooring that resembles real wood on your stairs. Many experienced homeowners regard Modin as a top-quality option.
Modin offers a wear layer of about 40mil which is double the depth of most other luxury vinyl plank flooring. Additionally, the underlayment is already attached, providing brilliant noise reduction and insulation.
Since Modin uses the click-and-lock installation method, your stairs must be level. This is to ensure the planks lock together properly. A benefit of Modin floors is that you get the stair noses included in the package.
Art3d Self-Adhesive Vinyl Planks

The Art3d Self-Adhesive Vinyl Planks are another option you might like to shortlist. Aside from being available in a wide range of wood grain finishes, they also have self-adhesive to make installation quick and easy.
Unlike the Lucida and Modin, these planks are considerably thinner at around 1.5mm. Thinner planks equal a cheaper price, which might work in your favor if you’re on a tight budget. Since the planks are thinner, they’re also lighter which means less adhesive is needed to keep them on vertical surfaces.
Perhaps the only downside with this option is that you’ll need to buy the underlayment separately.
FAQs
One of the top reasons vinyl is regarded as the ideal flooring material for a staircase is because it isn’t slippery. It’s also easy to install and just as easy to keep clean. Many homeowners opt for cleaning their vinyl with a solution of apple cider vinegar to avoid a soapy buildup.
Should vinyl stairs match existing floor designs?
This option is entirely up to your personal taste. Many homeowners prefer to have all their floors matching. Other homeowners use this as an opportunity to add a pop of color. You may even go so far as to only put vinyl on the stair treads and rather paint the risers a whole different color. Since no one’s ever going to walk on the risers, it’s entirely up to you!
Can narrow width vinyl be used on stairs?
Again, this simply comes down to your personal preference. You can either get 1 plank that fits the entire stair tread, in which case you’d opt for a wide plank. Alternatively, you can have 2 narrow strips covering your stair tread. This will go a long way to creating a unique look for your staircase!
Conclusion
We hope you learned how to install vinyl plank flooring on stairs! Not only are they affordable, durable, and easy to install, but they’re also available in a wide variety of designs and colors. You’ll easily find a design to complement the rest of the floors in your home!
If you have any comments or first-hand experiences with installing vinyl plank stairs, please post them below or share your pictures via our social media.
Back to Top